
Veneer Redo: Reviving a Same-Day Failure With Naturalness
Hello, I'm Park Jonguk, director of Dream Dental Clinic, who has provided esthetic dental care in Apgujeong for 20 years.
Today I'd like to introduce a veneer redo case.
More and more patients are coming back to us dissatisfied after having veneer treatment done with the same-day method.
The Pitfall of Same-Day Veneers
This patient had veneer treatment done with the same-day method 2 to 3 years ago.
At the time, she asked for the teeth to be made white, saying she wanted them brighter,
and the treatment was carried out exactly as requested.
The problem was that the result went too far.
Not only was the color excessively bright,
it was also opaque, and the shape looked awkward as well.
It looked flat and artificial, as if painted with white paint.
The patient said she was under constant stress about it.
"At first I thought it was great that they were so white,
but the longer it went on, the more strange and unnatural they started to feel," she said.
The people around her also frequently told her, "Your teeth look really artificial."
In the end, she came to our clinic to have them redone with a more natural feel.
Before Treatment: The Problems With Same-Day Veneers
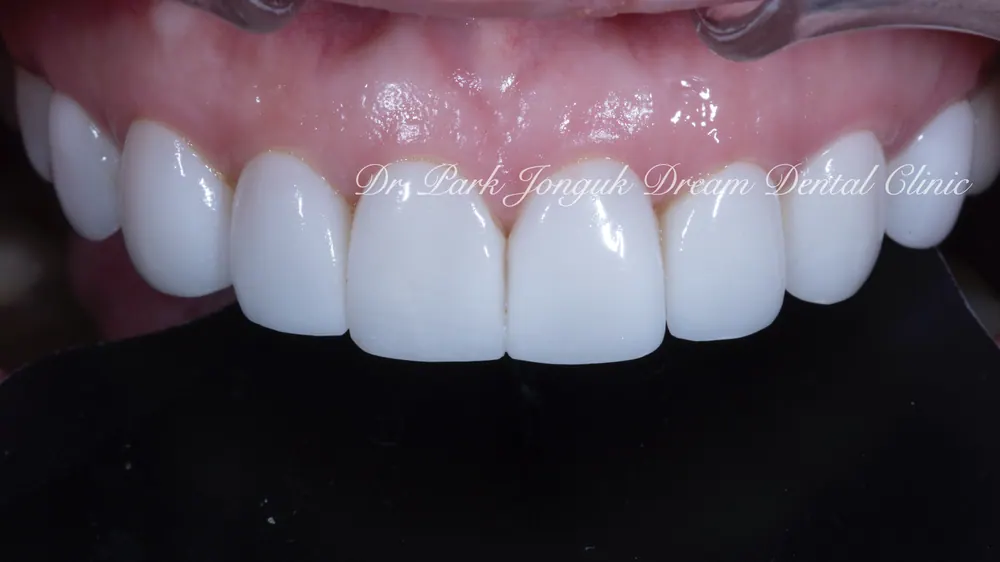
Photo 1 shows her appearance at her first visit. The typical problems of same-day veneers are visible at a glance.
First, the color was too bright and opaque.
They were white, but had absolutely none of the translucency of a natural tooth.
Light couldn't pass through and simply bounced off the surface.
Second, the shape was awkward.
They were flat and lacked three-dimensionality, looking as if tiles had been glued on.
Natural teeth have subtle curves and contours, but none of that was present.
Third, every tooth looked identical.
Natural teeth each differ slightly from one another,
but the same-day veneers looked as uniform as if they'd been stamped out by a computer.
It was easy to understand why the patient said, "Every time I looked in the mirror, it didn't feel like my own face."
Precision Diagnosis: Where the Redo Begins
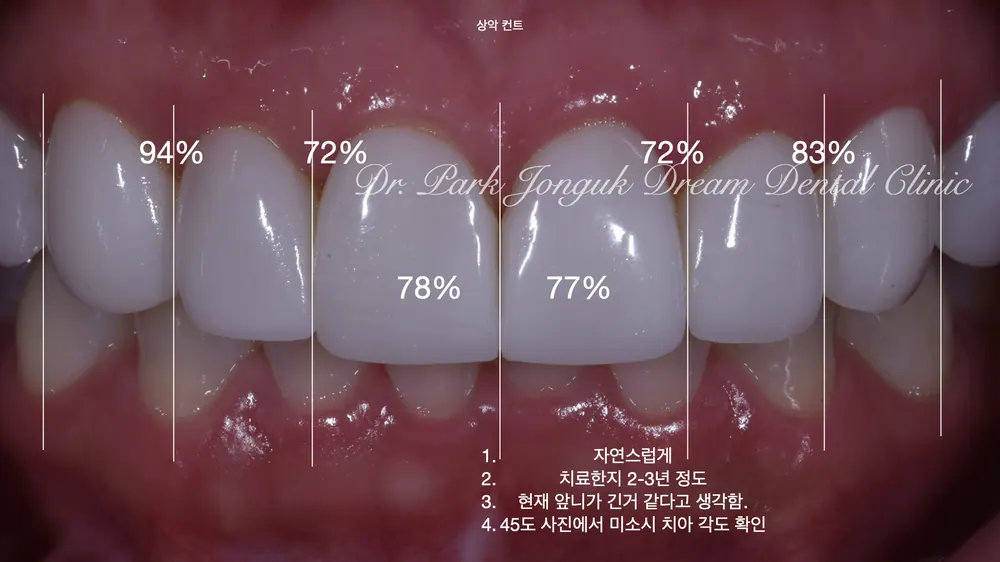
Photo 2 shows the diagnostic process for treatment.
A veneer redo needs to be approached even more carefully than the initial treatment.
This is to avoid repeating the same failure.
I precisely measured the size and proportions of the teeth.
The existing veneers had inappropriate size and proportions.
By analyzing the patient's face size, lip line, and smile curve, I calculated the optimal tooth size.
I also spent plenty of time consulting with the patient.
I explained that while she wanted a bright color, naturalness mattered just as much.
Rather than just plain white,
I helped her understand that translucency and three-dimensionality are what make teeth genuinely beautiful.
The patient agreed, saying, "This time, I'd like them to be bright but also natural."
Previewing the Final Result With a Wax-Up
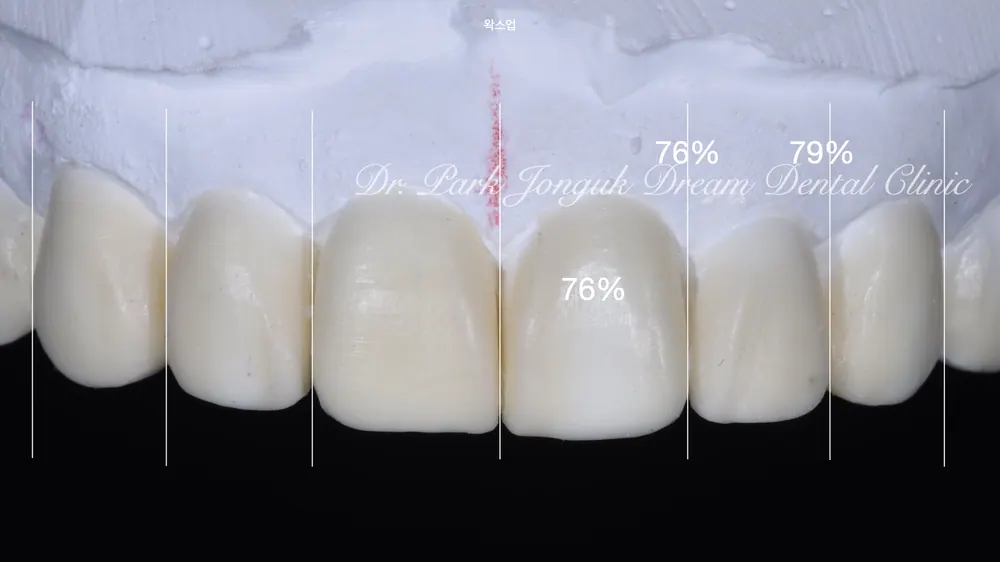
Photo 3 shows the result of the precision wax-up diagnosis.
This is the process of previewing the shape of the final veneers based on the diagnostic findings.
The tooth size was adjusted to suit the patient's face.
It was designed with natural proportions, neither too large nor too small.
Shape mattered too — so it wouldn't be flat, but would have three-dimensionality,
each tooth was designed to have its own unique character.
Rather than being perfectly symmetrical, subtle differences were preserved, just as in natural teeth.
When the patient saw the wax-up model, she felt reassured and said, "Now it finally feels like I'm getting the right treatment."
Safely Removing the Veneers With a Laser
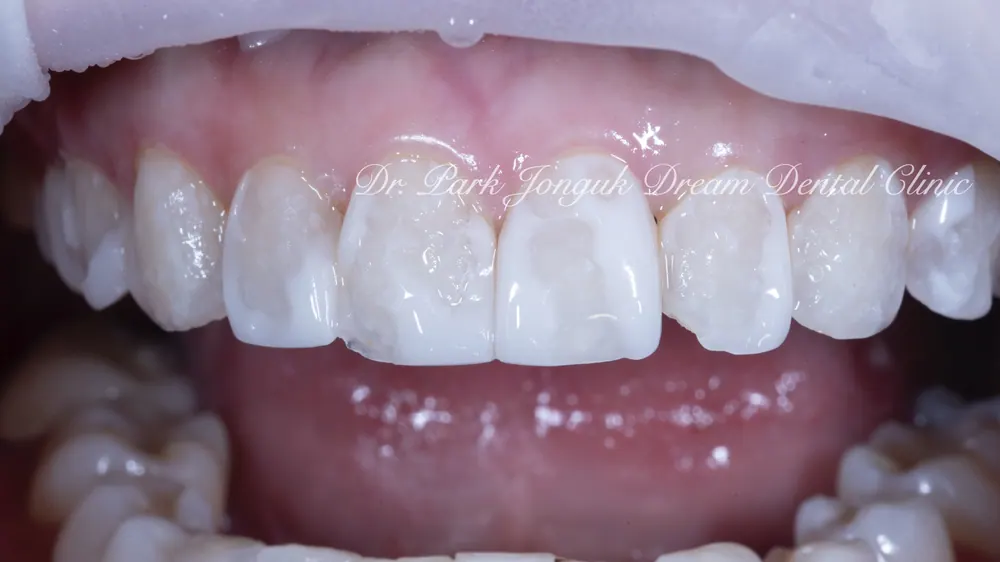
Photo 4 shows the process of removing the existing veneers using a laser.
This is the step in a veneer redo that requires the most care.
It requires careful work so that the tooth isn't damaged while removing the existing veneer.
We use a laser.
A laser can selectively remove just the bonding layer between the veneer and the tooth, which minimizes damage to the tooth.
Video 1, though not of this particular patient, shows the process of removing a veneer with a laser.
As the laser light precisely burns through the bonding layer, the veneer carefully comes loose.
This is far safer and more precise than removal with a standard dental drill.
After Removing the Veneers: Checking the Condition of the Teeth
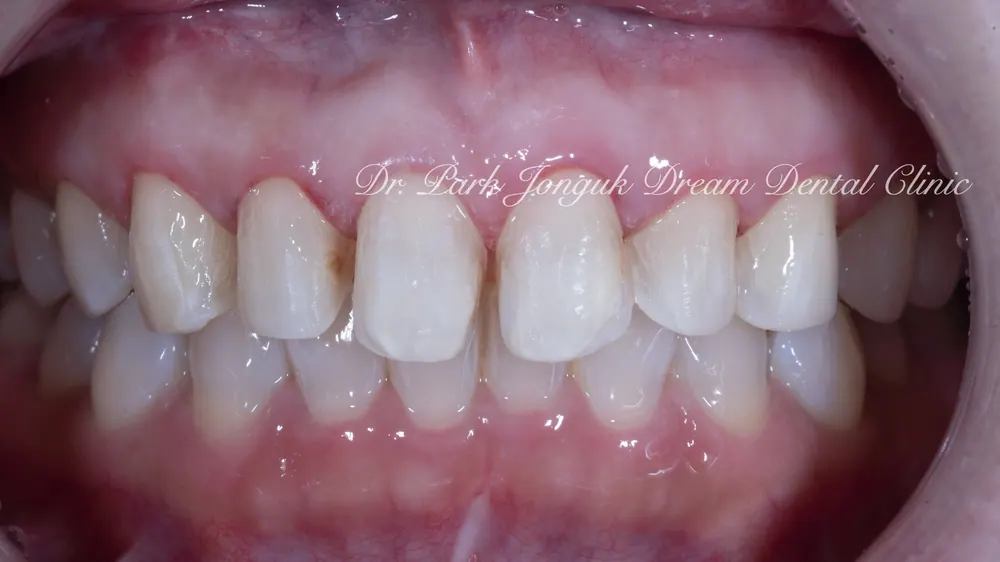
Photo 5 shows the teeth after all the veneers were removed.
Unfortunately, the teeth had already been reduced significantly.
Same-day veneers are marketed for the advantage of being "fast,"
but in practice, they often involve reducing far more tooth than necessary.
Without a precise plan, teeth are simply cut to a fixed depth,
which damages the tooth more than necessary.
A tooth that has already been reduced can never be restored.
But I committed to doing everything I could to protect what remained of the tooth while still achieving a beautiful result.
Testing the Final Result With Temporary Teeth
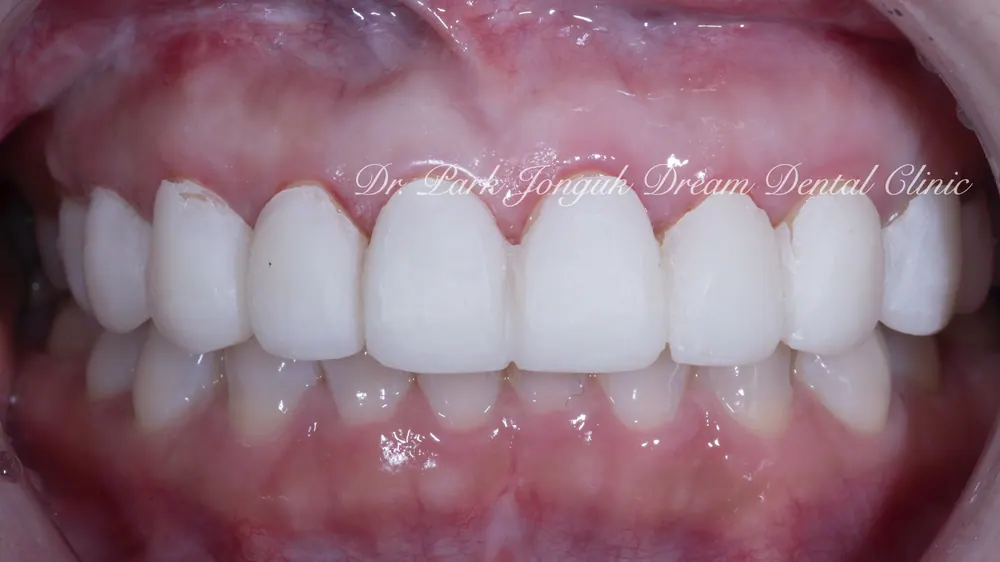
Photo 6 shows the temporary teeth that were made.
This is the step where temporary veneers, based on the wax-up design, are fabricated and actually tried in the mouth.
At the temporary veneer stage, the shape, size, and color are tested, and the patient's feedback is gathered.
We check things like whether they seem too large, whether the color is to the patient's liking, and whether they look natural when smiling.
When the patient saw the temporary teeth, she was pleased and said, "These already look far more natural than before."
After Treatment: A Bright Yet Natural Smile
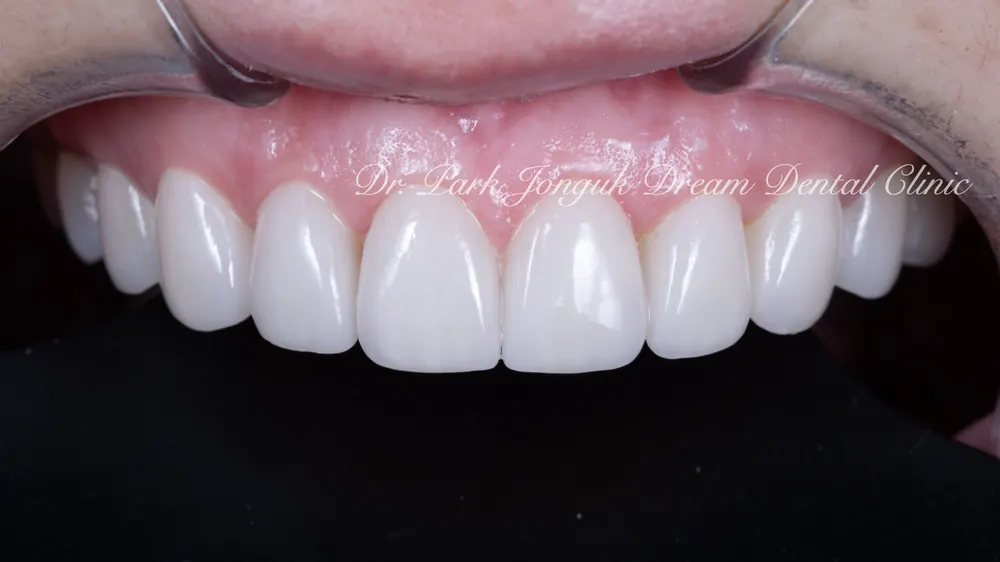
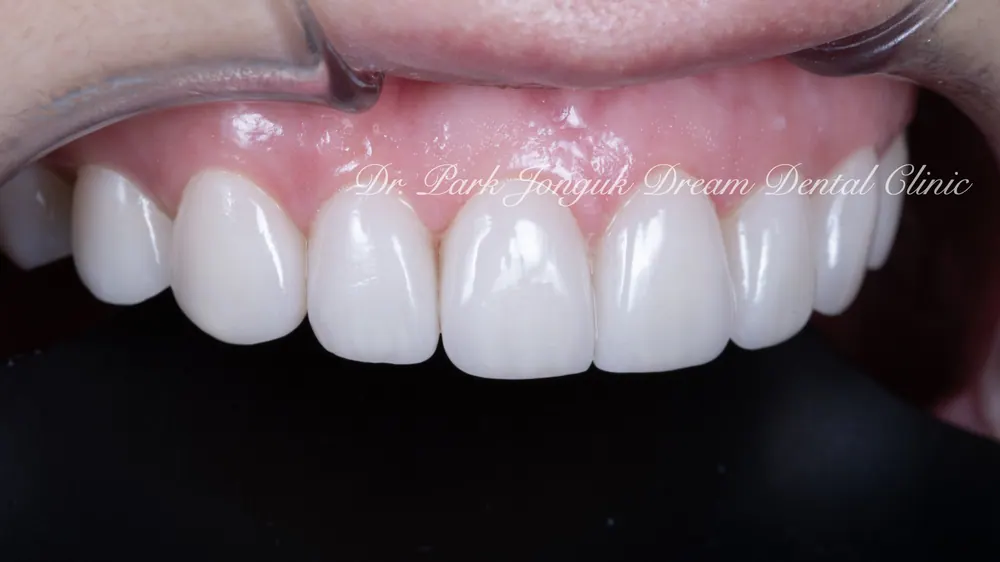
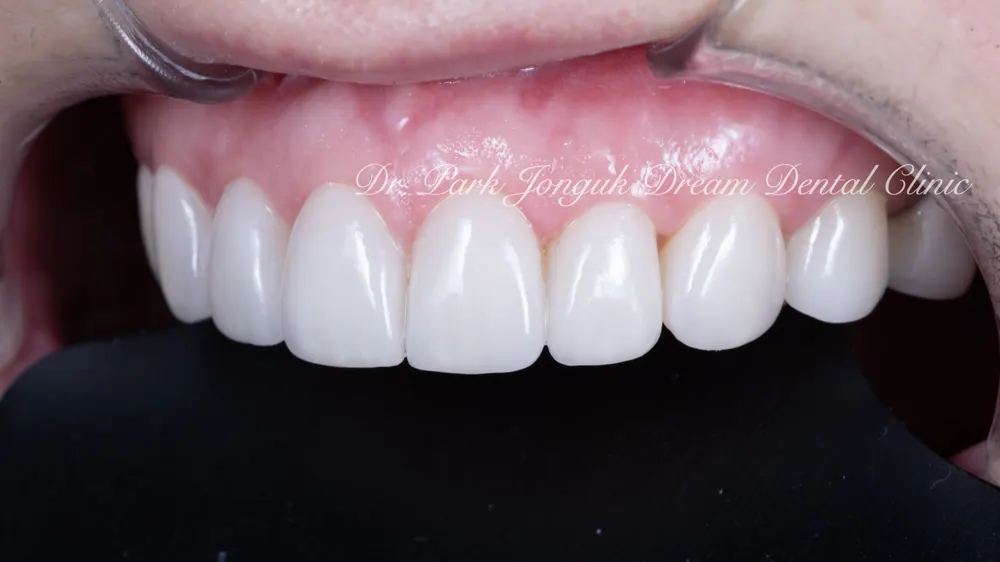
Photos 7, 8, and 9 show the result after treatment. It's a truly remarkable transformation.
Natural Shape
The shape of the teeth was designed to be more natural and better suited to her face shape.
Each tooth has its own unique character while still coming together in overall harmony.
They're not flat — the three-dimensionality is alive.
A Bright Yet Natural Color
The tooth color was made bright, just as the patient wanted.
But it's not just plain white.
Three-dimensionality was fully expressed.
There's subtle color gradation from the gumline to the incisal edge, and light and shadow are expressed naturally.
Translucency was added at the incisal edge.
Natural teeth become more translucent toward the incisal edge,
and this characteristic was precisely recreated. This is exactly what naturalness comes down to.
Bright, yet natural. White, yet looking like real teeth.
This is the decisive difference from the same-day method.
Same-Day Method vs. Handmade Build-Up
Why does this difference happen? It comes down to the fabrication method.
The same-day method is made from a single piece of ceramic.
It's a method where a single ceramic block is milled by computer.
It's fast and convenient, but has clear limits when it comes to expressing natural color variation, translucency, and three-dimensionality.
A single block has the same color and the same translucency all the way from the inside to the outside.
That's why it looks flat and monotonous.
Because light simply reflects off the surface, it looks hard and artificial.
Handmade build-up layers multiple sheets of ceramic on top of one another.
It's a method where a skilled dental technician builds it up by hand, layer by layer.
On the inside, opaque dentin-colored ceramic is used,
in the middle, bright enamel-colored ceramic,
and on the outside, transparent ceramic.
The gumline area is given a warm tone, the middle section a bright tone, and the incisal edge a translucent tone.
Only with this multi-layer structure does light scatter and reflect softly through the veneer, just as it does in a natural tooth.
This is how three-dimensionality and translucency come alive, resulting in a tooth full of vitality.
This is precisely the advantage that only handmade build-up offers.
It takes more time. It can cost more too.
But the difference in the result is on a scale that simply can't be compared.
Rather than doing it the same-day way and needing a redo again in 2 to 3 years,
doing it properly from the start is by far the wiser choice.
The Patient's Satisfaction, and Our Own Sense of Fulfillment
When the patient looked in the mirror after treatment was finished, she was genuinely overjoyed.
"I finally feel like I've gotten my own face back. They're bright yet natural.
Before, they were just plain white, but now they're translucent and three-dimensional, just like real teeth."
"I feel like I can smile with confidence in front of other people now. I'm proud of my teeth now."
Hearing words like these is when I feel the fulfillment of being a dentist.
A veneer redo isn't simply about fixing a failed treatment — it's about giving the patient back their confidence and happiness.
Veneer Redo: Be Sure to Check These Things
To anyone considering a veneer redo, there's something I really want to tell you.
First, understand the limitations of the same-day method. It's fast and convenient, but it has clear limits when it comes to naturalness.
Second, check whether a precision diagnosis is included. A systematic diagnostic process that includes a wax-up is essential.
Third, ask whether the handmade build-up method is used. Only fabrication with multi-layer ceramic build-up can achieve a natural result.
Fourth, check whether laser removal is available. Safely removing the existing veneer is the first step of any redo.
Fifth, ask to be shown actual redo cases. Looking at before-and-after photos of similar cases will give you a sense of that clinic's skill.
Veneers are meant to be a treatment that lasts 10, even 20 years.
Rather than choosing something for being fast and cheap and then needing a redo within just a few years,
doing it properly from the very start is far wiser.
Frequently Asked Questions (Q&A)
Q1. Isn't it difficult to remove the existing veneer during a redo?
A. Using a laser allows us to selectively remove just the bonding layer between the veneer and the tooth, which minimizes damage to the tooth. It's far safer and more precise than a standard drill.
Q2. Is there a big cost difference between same-day veneers and handmade build-up?
A. The handmade build-up method requires more time and skill, so it can cost more. But when you consider naturalness and long-term satisfaction, it's a worthwhile investment. Considering the cost and stress of needing a redo within just 2 to 3 years, doing it properly from the start is far more economical.
Q3. Could I end up needing another redo after this one?
A. If it's made with precise diagnosis and handmade build-up, and you maintain it properly, you can use it without issue for 10 years or more. It lasts far longer than the same-day method, and esthetic satisfaction lasts as well.
Q4. Does going with a bright color always end up looking artificial?
A. No, it doesn't. Even a bright color can look natural if three-dimensionality and translucency are properly expressed. The key is expressing color variation and translucency through multi-layer build-up.
Q5. How long does a veneer redo take?
A. It generally takes about 2 to 3 weeks. This involves stages such as removing the existing veneer, diagnosis, the wax-up, temporary teeth, and fabricating and bonding the final veneer.
This article is based on the real clinical experience of a dentist who has provided esthetic dental care in Apgujeong for 20 years. I teach veneer techniques to dentists every month at Lamista Academy, and I have published Korea's first veneer textbook.
This article is a clinical note written by Dr. Park Jonguk of Dream Dental Clinic, Gangnam; the original was published on his blog. The photographs shown are real cases he treated. Results vary with each patient’s condition, and every procedure carries the possibility of individual variation and side effects.
Quick Consult
Request a Callback
Leave your number and we will call you back during clinic hours.
Request Received
We will contact you during clinic hours. For urgent matters, please call +82-2-3448-0028.