
Peg Lateral Veneers: How to Also Resolve an Oversized Central Incisor and a Thick Root
Hello, this is Apgujeong Dream Dental Clinic.
"My lateral incisor was always so small, it was a constant complex."
"I had it treated once, but it came off, so I need to redo it."
Veneers for a peg lateral are a treatment many people seek out.
Today's case isn't just about small-tooth veneers — it also involves incorrect reduction from prior treatment, an extremely large central incisor,
and, on top of that, a thick root — we're sharing a case with this combination of complex problems.
In particular, a peg lateral is usually treated with no-prep veneers,
but when the central incisor is too large, some reduction may also be needed for that tooth.
We'll show in detail how we solved all of these problems at once.
Before treatment: multiple combined problems
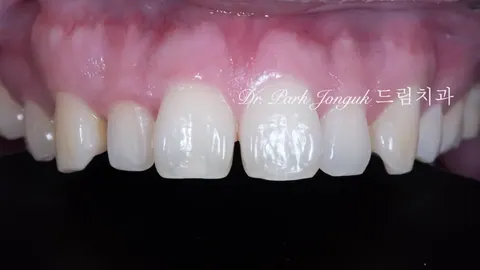
[Photo 1 - Initial visit]
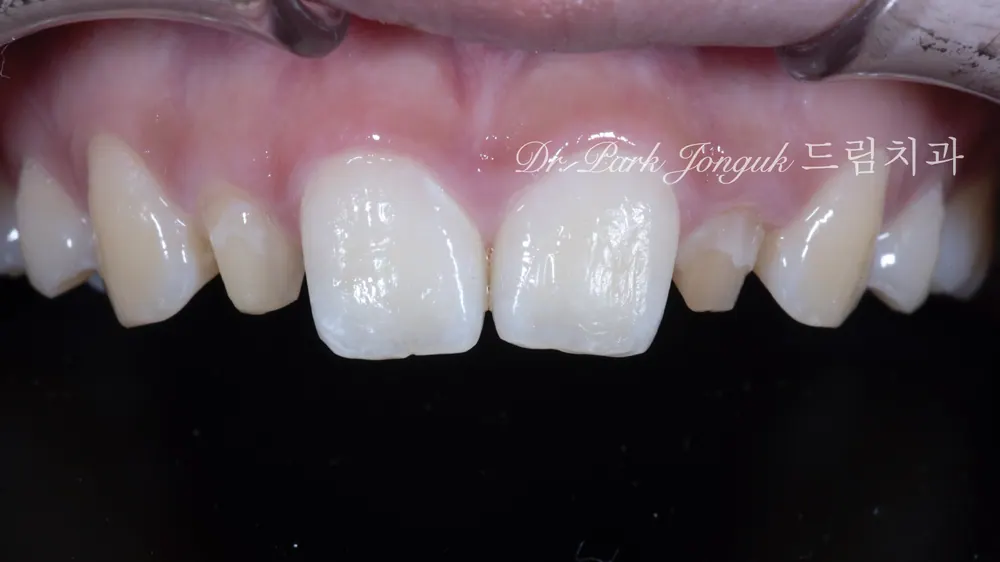
This patient had already received peg lateral veneer treatment at another clinic.
But it came off not long after, so she came to Dream Dental Clinic for retreatment.
Main problems:
❌ Excessive reduction on the peg lateral — a peg lateral is naturally small and shouldn't need reduction, but the previous clinic had shaved it down excessively. This was a real shame.
❌ An extremely large central incisor — not just slightly large, but considerably so. The contrast with the peg lateral was extreme.
❌ A thick root — this was the trickiest problem of all. A thick root makes tooth reduction harder and makes it genuinely difficult to achieve an esthetic result.
❌ Retreatment due to debonding — the burden of having to treat a tooth again after it had already been reduced once
Why is a thick root difficult to work with?
This is something many people wonder about — a thick root adds considerable difficulty to veneer treatment.
Problems during reduction:
When the root is thick, the whole tooth is bulky.
There's more resistance during reduction, and it takes longer.
It's harder to achieve the desired shape.
Esthetic problems:
When the root is thick, the cervical area (near the gum) looks bulky.
It's harder to create a natural tooth contour.
The angle where the tooth emerges from the gum can look unnatural.
In cases like this, design becomes extremely important. It's not just about matching size — the key is how to make it look natural.
Treatment plan: solving it through design
[Photos 2, 3 - Design plan]
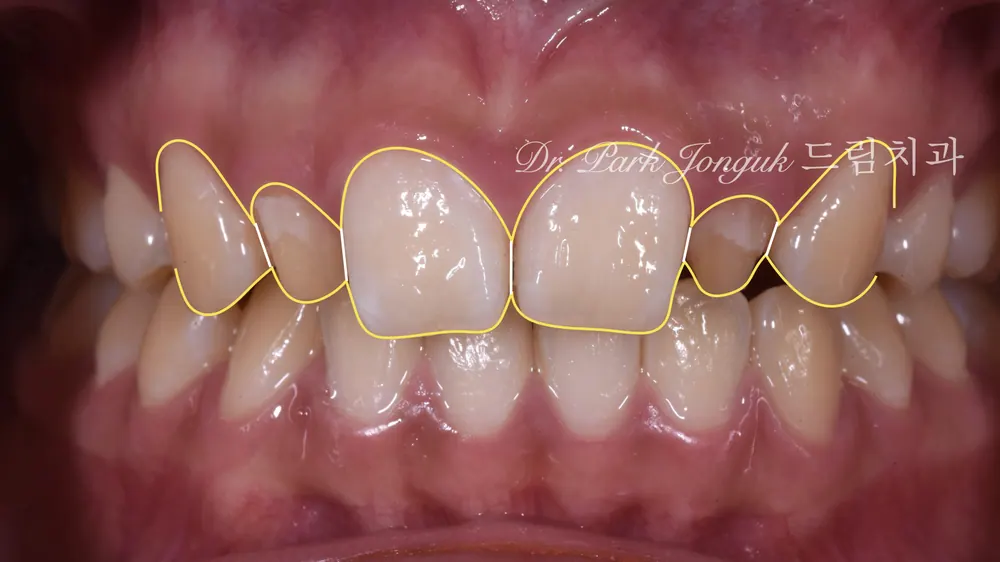
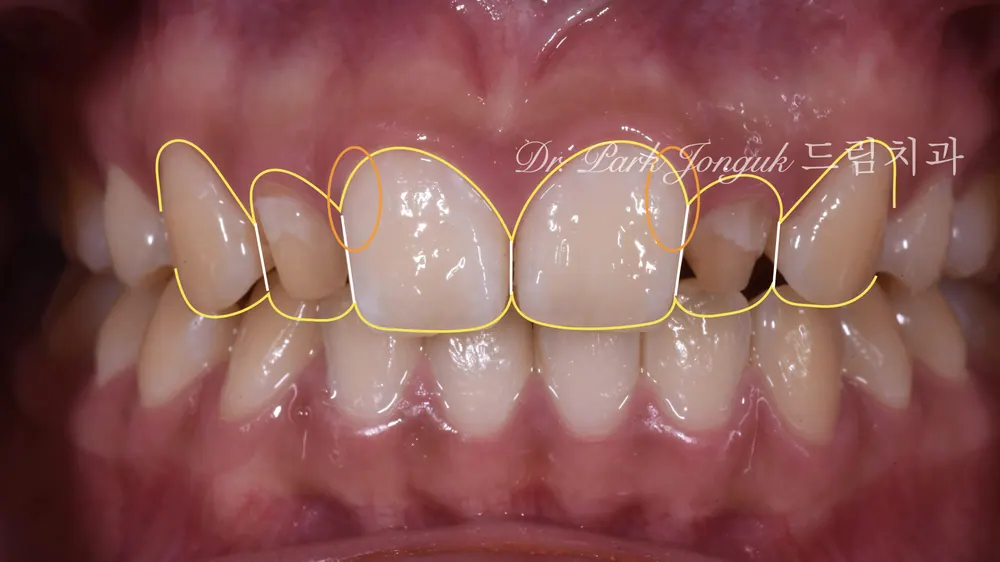
We drew out a plan for what shape the current state needed to be changed into.
Core strategy:
1. Reducing the central incisor's size. Since the central incisor was very large, its size had to be reduced. This required an appropriate amount of reduction.
Many people ask, "Isn't a peg lateral supposed to be no-prep?" But if only the peg lateral is built up without prep while the central incisor is left as is, the already-large tooth becomes even larger, creating a serious esthetic problem. The central incisor has to be considered together with it.
2. Enlarging the peg lateral. The already-reduced peg lateral is built up to a normal size with a veneer.
3. Adjusting the proportions. The proportion between the central and lateral incisors is brought into ideal balance.
4. Addressing the thick root. Color and shape are used to visually improve the appearance of the thick root. (This is the key technique!)
Precision wax-up diagnosis: turning the plan into reality
[Photo 4 - Wax-up complete]
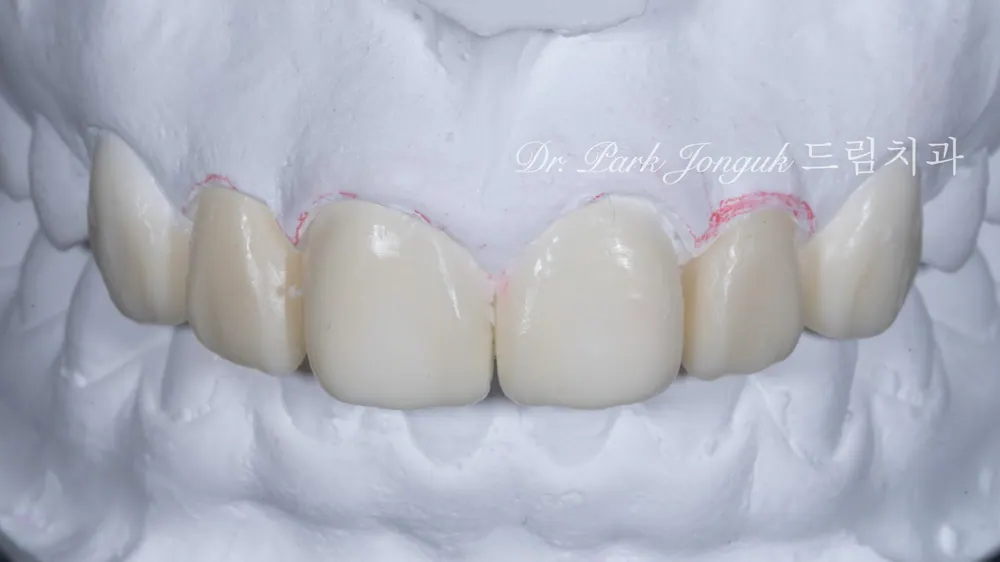
This is the precision wax-up diagnosis, where the design plan is realized in actual wax.
What we confirmed in the wax-up:
✓ The final size and proportion of the central and lateral incisors ✓ The exact amount of reduction for each tooth ✓ Tooth length and shape ✓ Harmony with the gums ✓ Left-right symmetry
Even in a peg lateral case, a wax-up is essential.
This is even more true for a complex case like this one.
Without a wax-up, adjusting the central incisor's size could fail, or the peg lateral could end up unnaturally large.
Tooth reduction: precisely according to plan
[Photo 5 - Reduction complete]
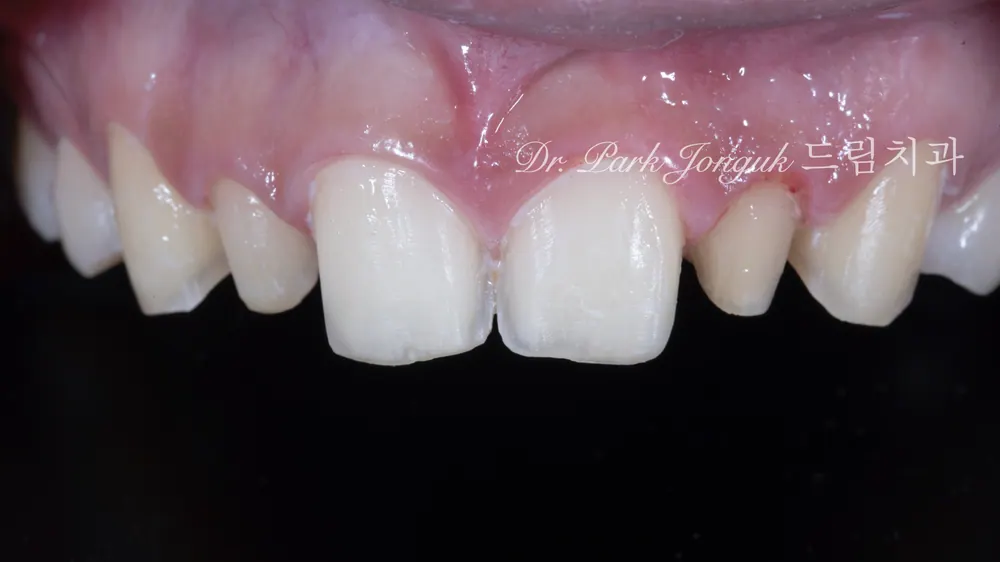
We carried out tooth reduction precisely, following the wax-up plan.
Details of the reduction:
Peg lateral (lateral incisor):
Already excessively reduced
Proceeded with no additional reduction
The over-reduction from the previous treatment was truly unfortunate
Central incisor:
Appropriate reduction to decrease its size
Careful shape adjustment accounting for the thick root
Cautious adjustment of the cervical angle
The thick root made reduction more difficult, but thanks to the precise plan, we were able to achieve the shape we wanted.
Fabricating the veneers: the technique of solving it with color
The key technique: yellow staining
What matters with peg lateral veneers isn't just making the tooth bigger — it has to look natural.
The key technique in this case was applying yellow staining to the cervical area (root side) of the central incisor.
The role of yellow staining:
✓ Reproducing the root's appearance. A natural tooth takes on a slightly yellow tone toward the root. Reproducing this in the ceramic creates a natural look.
✓ Solving the thick-root problem. The visual issue created by a thick root is naturally addressed through a color shift. Giving the cervical area a slightly deeper tone creates a sense of visual depth, which actually makes it look more natural.
✓ Adding dimensionality. Rather than a single flat color, a gradient gives the tooth a sense of life.
This kind of internal staining technique is only possible with hand-made build-up. A CAD/CAM approach cannot produce this kind of subtle color variation.
Treatment complete: a natural result
[Photos 6, 7, 8 - After treatment]
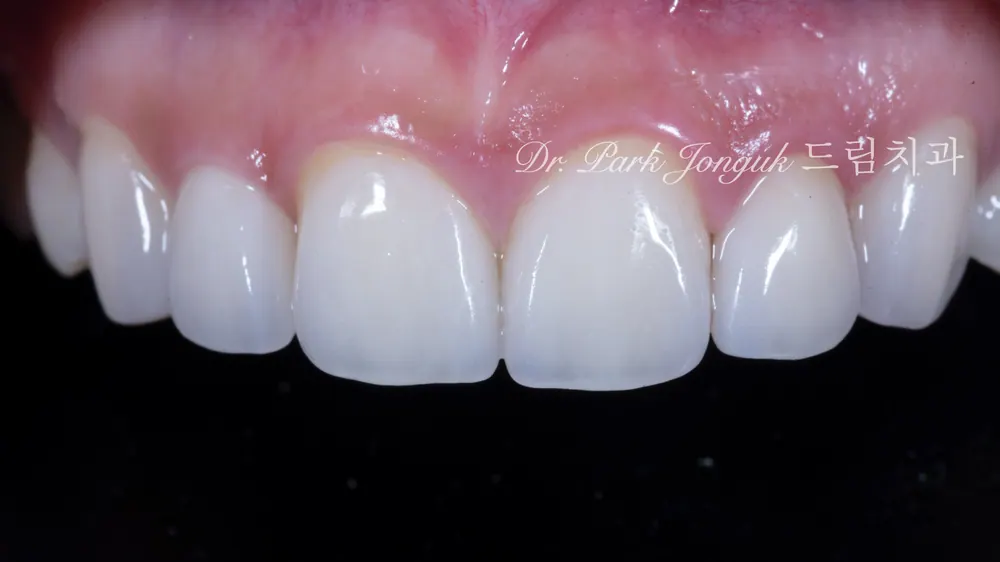
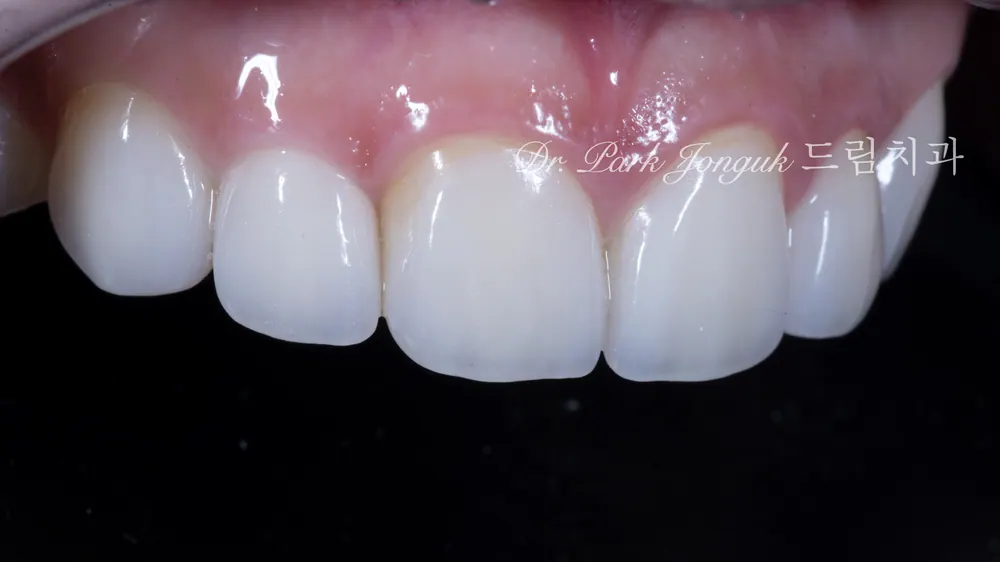
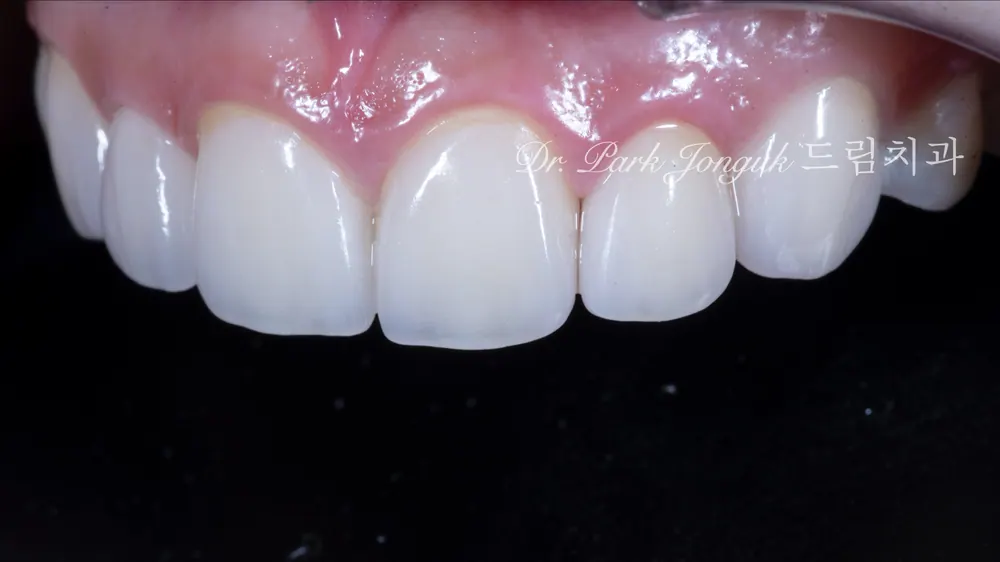
The peg lateral veneer treatment is finally complete!
Remarkable improvements:
✅ Perfect proportion between teeth. The peg lateral is now a normal size, and the central incisor has been brought to an appropriate size, creating overall harmonious proportions. The central incisor no longer stands out as unusually large.
✅ The thick-root problem solved. Thanks to the yellow staining at the root side of the central incisor, the thick root now actually looks like a natural root shape. The color shift creates visual depth, so there's no bulky feeling at all.
✅ Natural coloring. With a gradient rather than a single flat color, it looks just like a real natural tooth.
✅ Three-dimensional shape. Rather than flat, the three-dimensional shape gives a sense of life.
✅ Perfect harmony with the gums. Because the cervical design looks natural, the way the teeth emerge from the gums looks very natural.
As a result, this became a very natural, beautiful case of small-tooth veneers. All of the complex problems were resolved.
Conclusion: a peg lateral isn't as simple as it seems
The truth about peg lateral veneers
Many people think, "A peg lateral is no-prep, so it must be easy," but that's actually not true.
When it's only a peg lateral: it's relatively simple. All you have to do is enlarge it without reduction.
But as in this case, when there is also:
an extremely large central incisor,
a thick root,
incorrect reduction already done,
or it's a retreatment case,
these combined problems raise the difficulty considerably.
How Dream Dental Clinic solves it
1. A whole-mouth perspective. We don't just look at the peg lateral — we look at the overall proportions including the central incisors and canines. Enlarging only the peg lateral can actually look unnatural.
2. Precise planning. Drawing up a plan → wax-up → calculating the exact reduction amount. A complex case can't be solved without this process.
3. Color-design technique. Internal characterization like yellow staining esthetically solves even structural problems like a thick root.
4. Hand-made fabrication. Subtle color variation and three-dimensional shape are only possible when made by hand.
The reason I've specialized exclusively in veneers for 20 years, written the textbook 『최소 삭제를 위한 라미네이트 임상』 (Veneer Clinical Practice for Minimal Reduction), and teach dentists from across the country every month at Lamista Academy is precisely to properly solve difficult cases like this one.
"Even a peg lateral that looks simple requires an eye for the whole picture and precise technique."
Q&A: Questions About Peg Lateral Veneers
Q1. Is a peg lateral always treated without any reduction?
A. In most cases, yes, it's treated with no-prep. A peg lateral is naturally small, so it doesn't need reduction. But as with this patient, if the central incisor is very large, building up only the peg lateral without prep while leaving the central incisor unchanged makes the proportions even more off. The central incisor needs to be considered together to balance the overall proportion.
Q2. Is it wrong to reduce a peg lateral at all?
A. In principle, a peg lateral doesn't need reduction. Shaving down an already-small tooth further means the veneer has to be made thicker, which makes it look less natural to that same degree. As with this patient, when a previous clinic over-reduced the tooth, it narrows the options and creates difficulty at retreatment.
Q3. What should be done if the central incisor is large?
A. When treating alongside a peg lateral, if the central incisor is large, it absolutely needs to be adjusted as well. As in this case, it's appropriately reduced to decrease its size while the peg lateral is enlarged, balancing the overall proportion. Enlarging only the peg lateral without prep would actually look strange.
Q4. Why is a thick root a problem?
A. A thick root creates several problems. First, tooth reduction is harder and takes longer. Second, the cervical area (near the gum) looks bulky, which is esthetically unfavorable. Third, it's harder to create a natural contour. But as in this case, it can be visually resolved with color techniques like yellow staining.
Q5. What is yellow staining?
A. A natural tooth takes on a slightly yellow color toward the root. Reproducing this in ceramic is what's called internal staining technique. Applying yellow staining to the cervical area creates a natural root shape and visually resolves the thick-root problem as well. This is an advanced technique only possible with hand-made, multi-layer build-up.
Q6. Is retreatment possible for a peg lateral?
A. Yes, it is. But if the tooth has already been reduced, more caution is needed. As with this patient, if it was excessively reduced, a thicker veneer may need to be made. That's why doing it properly the first time matters so much. Retreatment is possible, but it's more difficult and more constrained than the first treatment.
Q7. What does peg lateral veneer treatment cost?
A. It varies depending on the difficulty of the case. The cost differs between simply treating a peg lateral alone and, as in this case, also adjusting the central incisor and resolving a thick-root problem. When advanced techniques such as precision diagnosis (wax-up), internal staining, and hand-made fabrication are involved, the cost increases accordingly. We recommend getting an accurate quote during a consultation.
Q8. Where in Gangnam can I find a clinic good at peg lateral veneers?
A. Check the following: ✓ Experience specializing in peg laterals (from simple cases to complex ones) ✓ Whether precision wax-up diagnosis is performed ✓ Hand-made build-up method (with color adjustment) ✓ An approach that considers overall proportion ✓ Verified expertise such as authoring textbooks and lecturing at academic conferences
I am the author of 『최소 삭제를 위한 라미네이트 임상』 (Veneer Clinical Practice for Minimal Reduction), and every month at Lamista Academy I teach special cases like peg laterals. With 20 years of specialized experience, I resolve even complex peg lateral cases naturally.
This article is a clinical note written by Dr. Park Jonguk of Dream Dental Clinic, Gangnam; the original was published on his blog. The photographs shown are real cases he treated. Results vary with each patient’s condition, and every procedure carries the possibility of individual variation and side effects.
![[Peg Lateral Veneers] From a Strong-Looking Impression to a Soft, Feminine Smile — The Esthetics of Front-Tooth Veneers](/column-media/224178565168/thumb.webp)
Quick Consult
Request a Callback
Leave your number and we will call you back during clinic hours.
Request Received
We will contact you during clinic hours. For urgent matters, please call +82-2-3448-0028.